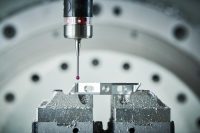
When creating custom magnets or magnetic assemblies, ensuring the final measurements properly align with the CAD model is imperative. At Dura Magnetics, we employ a coordinate measuring machine (CMM) during our quality inspection process. The CMM provides efficient, accurate, and consistent measurements of multidimensional shapes to ensure our customers receive conforming product every time.
A CMM works on a closed loop system, using vision feedback from a camera or a precision touch probe to collect specific data about a part’s features. In this way, the CMM provides precise, absolute location information. The CMM easily measures the distance between two points or calculates more complex geometries.
Via the vision system, we collect 2D-measurements such as radii, chamfers, and features that are difficult to reach with traditional measuring instruments. With the touch probe, the CMM is able to measure perpendicularity, parallelism, countersinks, and flatness in 3D. Using the vision system and touch probe together allows measurement of angles, hole locations, and concentricity.
The CMM is also used to directly compare the manufactured magnet to the CAD model. This can be helpful in many cases; for example, when measuring the curvature of a shape that is not an exact circle. Vision systems typically generate a best-fit circle, which can cause form errors up to 0.030 inches. However, using a point cloud, we overlay the measurements of the model directly onto the magnet to determine if it conforms to the print based on input tolerance levels. This process allows us to accurately determine whether or not the curve is conforming, even though it is not an arc of a circle.
Our programmable CMM allows for repeated robotic inspection for efficient quality control magnets. This efficiency is passed on to our customers as consistent high quality and lower cost. CMM programming allows for the utilization of batch runs, wherein multiple parts are inspected together. To assist with this process, we utilize a vacuum chuck table to manufacture acrylic plates that provide precise fixturing of the parts on the CMM table.
The CMM is an incredibly useful machine, but it must be carefully deployed because probes contain ferrous connectors that can interact with some magnets. We are aware of these issues and compensate in our fixturing and programming to eliminate measurement errors. The CMM is also so precise that dust or debris can affect the output of the vision system. Cleaning with compressed air or other means is utilized to remove unwanted particles from every part before starting tests.
When developing a magnet or magnetic assembly, we understand how important quality is to our customers. By using a coordinate measuring machine during the quality control process, you will receive a product that meets your requirements the first time, and every time thereafter. Contact us to learn more about our capabilities with custom magnet solutions.

